This weekend from Friday evening through Sunday noon our CS department held an in-house Hackathon in which groups of students worked on their own original software projects. Inspired by other hackathons and our participation in A.I. programming competitions in Rolla, we set out to do something fun on our own terms from the comfort of our local computer lab.
Several groups attended and everyone had really cool ideas and projects to work on. As we all settled into the lab Friday night, the first order of business was to customize our work area. Every other computer had its monitor disconnected to feed each of the ones we were using – dual monitors were the order of the day. I also got lucky and nabbed the only set of speakers in the lab and so would have free reign over Pandora and Google Play the whole time. And of course you can’t have a bunch of guys partying in a computer lab without ordering a bunch of pizza.
The pool of active projects consisted of a weather application, a Golden Gun mod for Minecraft, an event-based social media-connected website, a D&D character creator, a learning A.I., a Battleship-style A.I. battle game, probably others that I can’t remember at the moment, and our own project. Ours was a digital steganography tool that we named PixelSaurus. Most of the projects got to a point of near-completion by the end of Hackathon, and hopefully will be completed by their authors in the coming days and weeks.

RAWR
PixelSaurus was an awesome program to develop and exposed us to the world of image formatting and low level bit manipulation. My teammates Alec and Sam have dabbled in cryptography before, and when the idea for a steganography application surfaced I was very excited. I was familiar with the concept but had never seen an actual implementation. The methods are fairly well-known, so with a little research we knew the direction in which we needed to go to make it happen. We were confident as we set out to create a program that could encode messages and other binary information inside digital images, as well as decode the images to retrieve the hidden messages/data.
embedding a .ogg sound file in a .bmp image
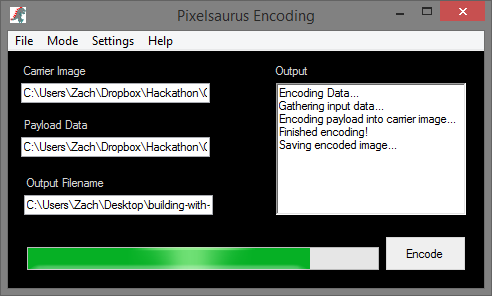
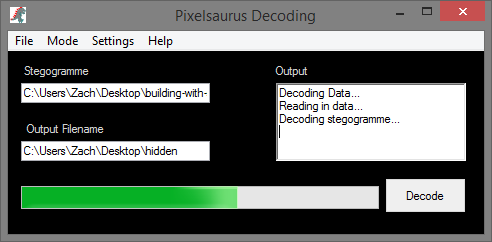
There are three data points that PixelSaurus works with:
- the Carrier – an image chosen to hold our secret data
- the Payload – the plain text message or file to be hidden within the Carrier
- the “ensteganized” image – carrier + payload that, to the human eye, appears exactly like the original image
pulling the hidden sound file out of the carrier image
Here’s an example of an image operated on by PixelSaurus. On the left is the original unmodified image; on the right, the ensteganized image with a .ogg sound file embedded inside it:
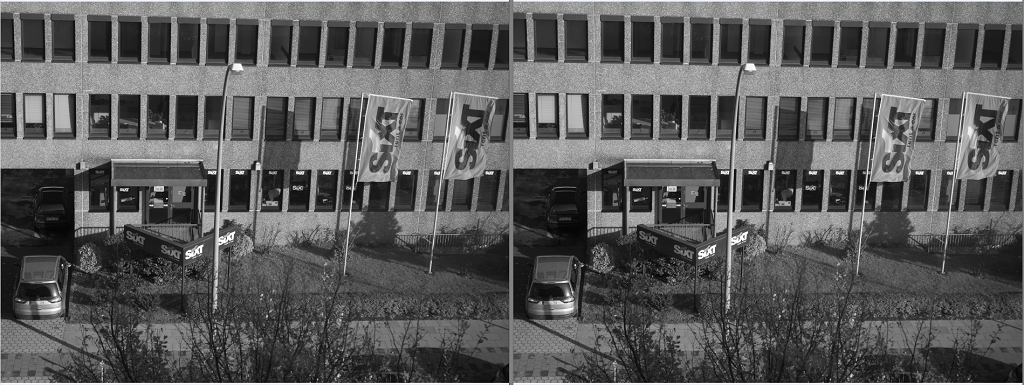
before/after encoding – identical to the human eye, even when zoomed in at the pixel level
When we decode the ensteganized image, PixelSaurus outputs the sound file that plays just as perfectly as it did before it was encoded. Cool, huh?
There are many methods with which one can hide data inside images. We chose the most simple and straightforward one called Least Significant Bit Insertion, or LSB Insertion. The idea is that in each byte of carrier image data, we can change one bit to a bit from our payload. Knowing which bits in the carrier that belong to our payload then allows us to piece the payload back together during the decoding process.
Each pixel in a bitmap image uses 4 bytes of data – one for each of four channels – alpha (opacity), red, green, and blue. Each of those channels are stored in an 8-bit byte, yielding 2^8 (256) possible values. So each channel’s byte is basically a number from 0 to 255 that represents the intensity or shade of that color in the pixel. The “least significant” bit in these bytes is the bit that adds only 1 to that value. So when we change those bits during payload insertion, we are changing that color’s intensity at an imperceptible level, since we are only modifying the byte’s value by 1.
Makes sense, right? Good. 🙂 As always, the implementation was trickier to accomplish than we thought. At first it appeared like we would have a working algorithm by midnight Friday night until we finally got to test it and found out that it did seem to insert the payload, but also corrupted the carrier image during the process. Not good; the goal is to still have a legitimate image file that can be opened and viewed in normal image programs, hiding our payload data in plain sight. It turned out we were blasting right through the bitmap files’ header data as well as the pixel data, when we needed to only be modifying the pixel data. By changing the bitmap headers’ bytes we were, for most intents and purposes, destroying the carrier image.
Fortunately the .NET framework we used makes it very easy to get straight to the pixel data so we got it working sometime before dinner on Saturday. Having reached a good stopping point, we went out for a big group dinner. When we got back our task turned to putting together a decent user interface as well as finalizing a metadata scheme of 56 bits that stored the payload size and file extension that we inserted into the carrier before the payload itself.
All told this was a really fun project and definitely the coolest program I’ve ever worked on. It can be downloaded from Dropbox here if you’re interested in playing with it. Hide secret messages and files inside images and send them to your friends to decode! There are a few caveats:
- The carrier should be in .bmp file format. .png files worked in testing, but code-wise PixelSaurus expects bitmaps, so I don’t really know what will happen if you try others.
- The payload should be 1/8 the size of the carrier since we are inserting 1 bit of payload into every 8 bits of carrier. If we continue work on PixelSaurus, one of the next things to implement is to use additional carrier bits to allow the payload to be 1/4 or maybe even 1/2 the size of the carrier. Beyond that, so much carrier pixel data would be changed that the image quality would noticeably degrade.
- We tested carrier file sizes up to around 65 megabytes and found that although they took a bit of time to process, PixelSaurus could handle it. We only had a couple images larger than that to test with, and they usually crashed the program.
SEMO CS’s first Hackathon was deemed a rousing success. Most people had something cool to show by the end, and even if they didn’t, we all had a blast making the lab our own for a weekend of programming, shit-talking, and general tom-foolery.